





Egg cracks and dirty shells are often blamed on feed, handling, or flock health. In many layer houses, the real problem starts earlier: the cage system does not let eggs roll cleanly, separate quickly from birds, or stay protected on the way to collection. When that happens, operators see the same symptoms again and again—more floor-like contamination inside cages, more shell damage at the front wire, and more labor spent washing belts, trays, and manure contact points.
For people running or supervising daily production, cage design is not a cosmetic choice. It affects how the hen stands, where the egg lands, how far it rolls, whether manure drops clear, and how easy it is to clean corners that birds cannot avoid. Small design flaws can create repeated losses that never look dramatic in one day but accumulate across thousands of birds.
Where cracked eggs and hygiene losses usually begin
Most cracked eggs in cage systems do not come from a single cause. They result from impact, friction, crowding, poor support, or delayed collection. Hygiene problems follow a similar pattern. Shell contamination rises when eggs stay too long near hens, touch dirty wire, or pass through areas where dust and manure are not controlled well.
Operators should look at the sequence, not just the final defect:
- The hen lays the egg.
- The egg contacts the cage floor.
- The floor slope moves the egg toward the front.
- The egg reaches the egg guard or collection point.
- The egg waits for manual or automatic collection.
If any step is too rough or too slow, shell breakage and contamination increase. A common mistake is to focus only on collection equipment while ignoring the wire floor angle, front opening geometry, or egg retention details that act on the shell before collection even starts.
How cage floor geometry affects shell damage
The floor wire and slope do most of the hidden work in a layer cage. If the slope is too flat, eggs may remain under the hen longer, increasing pecking risk, manure contact, and shell staining. If the slope is too steep, eggs can roll too fast and strike the front too hard. Either condition raises losses, just in different ways.
Wire support matters as much as slope. A floor that sags or flexes unevenly changes the egg path from one section to another. Some eggs roll smoothly; others bounce, turn sideways, or stop at low spots. In older systems, operators may notice that cracked eggs cluster in certain rows rather than the whole house. That pattern often points to variation in floor tension, deformation, or installation level, not to a flock-wide shell issue.
The wire surface itself also deserves attention. Rough welds, sharp points, or poorly finished transitions can scratch shells and collect dirt. A shell may not visibly crack at the moment of contact, yet micro-damage can weaken it enough to fail during collection or packing.
Front cage details that often cause more breakage than expected
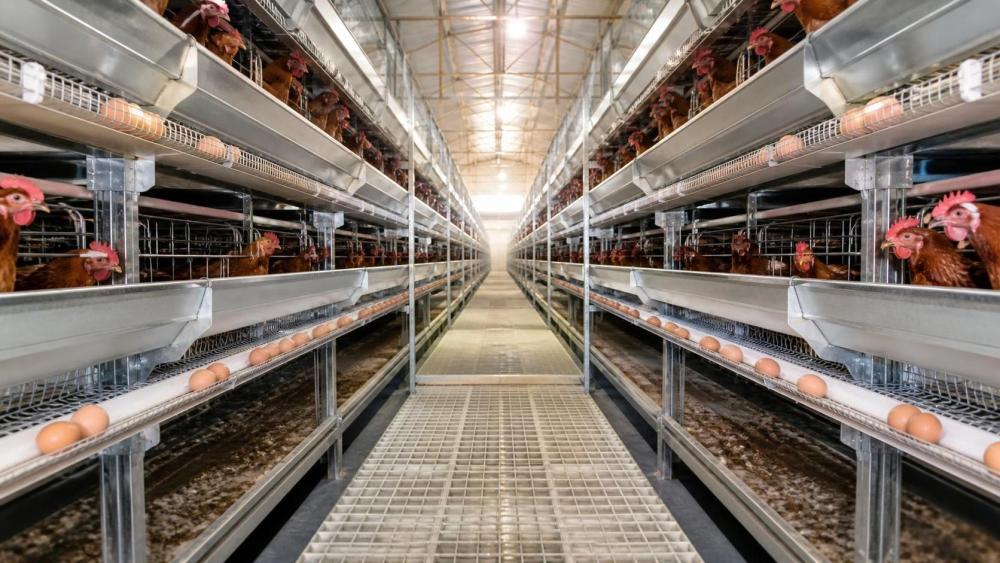
Once the egg reaches the front, design details become critical. The egg guard must stop the egg from falling while avoiding a hard collision. If the guard is too rigid, too high, poorly spaced, or poorly aligned with the floor, eggs can knock against metal and crack at the large end. If it is too open, smaller eggs may slip or jam.
Front doors and feeding structures can create secondary hazards. In some layouts, protruding wire ends or narrow clearances near the trough interfere with the egg’s path. Dust and feed fines may also settle where eggs rest before collection, adding a hygiene issue to a breakage issue.
This is where buyers often start comparing actual poultry farming cage design options more carefully, not just bird capacity per unit. The more useful questions are practical ones: how the egg is guided, whether the front edge cushions contact, whether there is consistent rolling behavior across all tiers, and whether the collection area stays accessible for inspection and cleaning.
Why manure flow and ventilation around the cage matter for shell cleanliness
Dirty eggs are not always caused by poor washing discipline or late collection. In many houses, contamination begins because manure does not drop cleanly away from the bird area. Cage bottoms, supports, or manure belt arrangements that trap droppings too close to the egg path raise the chance of shell soiling. Fine dust from dry manure can also settle on eggs, especially when ventilation pushes particles forward toward collection zones.
In multi-tier systems, the relationship between upper and lower rows needs attention. If manure containment is weak, birds or eggs below are exposed to contamination from above. Even when manure belts are present, alignment problems, spillage at belt edges, or delayed belt operation can undermine shell hygiene.
Airflow interacts with all of this. Strong drafts in the wrong direction may dry manure into airborne dust and carry it toward the front of cages. Poor airflow may leave damp areas that encourage sticky contamination on wire and equipment. Neither problem is solved by cage hardware alone, but good cage design should support manure separation and allow ventilation to work without turning the egg zone into a dust path.
Signs the cage is contributing to the problem
Operators can often identify a design-related problem by looking at patterns rather than averages. A flock nutrition issue tends to affect shell quality broadly. A cage problem usually appears in repeated locations or at repeated contact points.
- Cracks concentrated in specific tiers, rows, or cage sections
- Dirty shells mainly from eggs collected after longer lay intervals
- More breakage among smaller or larger eggs due to poor guard spacing
- Eggs resting sideways, stopping halfway, or bunching at the front
- Shell stains matching wire contact points or manure splash patterns
- Higher hand cleaning needs at corners, supports, and front edges
If the same defects reappear after flock changes, feed adjustments, and staff retraining, the layout should be examined more critically. It is common for operations to improve handling and still see only limited gains because the egg is already damaged or contaminated before anyone touches it.
Inspection points before blaming management or flock condition
Daily users are in the best position to spot design failures because they see how eggs move in real time. A useful inspection routine does not require laboratory tools. It requires consistent observation during laying hours and collection.
Check egg travel behavior
Watch whether eggs roll smoothly and stop consistently at the front. A good system moves eggs promptly without visible bouncing or sudden impact. If eggs hesitate, turn, or collide with each other, look for uneven floor sections, sagging wire, or poor front alignment.
Check for damage points on the wire and guard
Run a gloved hand along the egg travel path. Rough welds, broken coating, bent wire, or sharp transitions often explain recurring shell marks. Examine the front guard from the bird side and collection side; many impact points are more obvious from one angle than the other.
Check manure separation
Look underneath and between cage rows. Are droppings falling clear, or collecting where birds can step in them and where eggs may contact dirty surfaces? In systems with belts, inspect belt tracking, edge cleanliness, and points where manure spills during movement.
Check cleaning access
Any surface that cannot be reached easily tends to stay dirty. Deep corners, narrow gaps near supports, and awkward front structures often become hygiene traps. A cage that is difficult to clean when new usually becomes much harder after months of dust, scale, and corrosion.
What buyers should compare when selecting a layer cage system
Purchase decisions often focus on stocking density, building fit, and automation level. Those matter, but they do not replace basic egg protection and sanitation performance. A lower upfront price can become expensive if the cage increases breakage, egg washing rejects, or labor hours for cleaning and maintenance.
For buyers reviewing A-type battery cage arrangements, the practical question is not whether the system is simple or automatic in name. It is whether the layout manages egg movement and sanitation predictably under everyday use, including flock variation, uneven house conditions, and maintenance wear over time.
Installation errors that mimic bad design
Even a well-planned cage can perform poorly if installed badly. Operators should be careful not to confuse installation defects with product defects, because the corrective action differs. Frames that are not level change the real floor slope. Loose fasteners allow vibration. Poor joining between sections creates offsets where eggs strike or stall.
Water lines can contribute too. Nipple leakage or poor pressure control may wet litter-free cage surfaces, leading to sticky contamination on wire. Feed trough misalignment may force birds into awkward positions that disturb egg laying posture. When bird movement becomes cramped or unstable, eggs may be laid in ways that increase impact before rolling starts.
Acceptance checks after installation should include more than counting cages. Run test eggs through different rows. Confirm levelness across the house. Inspect all front edges for consistency. Watch manure belt operation under load, not only when empty. These observations catch many problems before they become routine production losses.
Corrective actions once problems appear
If breakage and hygiene problems are already visible, the response should be staged. Start with the lowest-disruption checks, then move toward component changes if patterns remain.
- Confirm shell quality is not primarily a flock nutrition or health issue.
- Map where defects occur by row, tier, and collection time.
- Inspect floor level, wire sag, and front guard alignment.
- Remove or repair sharp, bent, or corroded contact points.
- Review collection frequency so eggs do not wait too long at the front.
- Check manure belt timing, airflow direction, and dust accumulation.
- Replace sections that repeatedly fail rather than endlessly adjusting around them.
Some farms try to compensate for poor cage conditions by increasing labor at the packing end. That may reduce visible losses for a while, but it does not prevent the shell from being struck or soiled in the first place. The better approach is to treat egg protection and cleanliness as outcomes of the cage path from laying to collection.
A practical way to judge value before and after purchase
For operators and buyers, the most useful mindset is to treat cage design as part of process control. A cage is not only a structure that holds birds. It is also the first handling system each egg experiences. If that system creates rough contact, delays separation from manure, or hides dirty areas from cleaners, production losses are built into the routine.
When evaluating a system, ask how it behaves on an ordinary day with ordinary staff, not just how it looks in specifications. Eggs should roll quickly but gently. Front parts should protect rather than strike. Manure should move away from the egg zone without creating dust or spillback. Cleaning should be possible without dismantling half the row. Those details often decide whether a house produces stable output or spends every week chasing the same cracked and dirty egg problems.
Related News
- How to interpret active matter on a surfactant specification sheetOct 14, 2026Prof. Elian Thorne
- What Quality Checks Should You Run on Fragrance Ingredient Suppliers?Oct 14, 2026Prof. Elian Thorne
- How to assess a flavor chemistry manufacturer's batch consistencyOct 13, 2026Prof. Elian Thorne
- What drives fragrance ingredients price changes in bulk orders?Oct 12, 2026Prof. Elian Thorne
Related News
- 00
0000-00
Verifying halal status of hydrocolloid ingredients in the Middle East - 00
0000-00
How to interpret active matter on a surfactant specification sheet - 00
0000-00
What Quality Checks Should You Run on Fragrance Ingredient Suppliers? - 00
0000-00
How to assess a flavor chemistry manufacturer's batch consistency - 00
0000-00
What drives fragrance ingredients price changes in bulk orders?
Prof. Elian Thorne
Weekly Insights
Stay ahead with our curated technology reports delivered every Monday.